Total Pageviews

Thursday, March 8, 2012

Best Turkey Sliders Eva!

These are the only turkey burgers I've ever been able to eat, and they are amazing.

I got this recipe for burgers when I was doing the Biggest Loser on-line diet. I saved my favorites and eat them regularly.

When I found the little mini whole wheat Sandwich Thins, I got the idea to make sliders, which makes you feel like you're getting twice as much.

These little beauties only have 56 calories per slider, and 50 calories per whole wheat Sandwich Thin mini. For those of you following along, that's TWO sliders, fully loaded, with fixins, for 212 calories!

I don't bother counting lettuce, tomato & salsa. There's so little of it here, and the calorie counts would be so small, its' a waste of time in my opinion. If you're a real stickler for those sort of things, I suppose you can look it up. My time is too valuable to waste looking up lettuce calories, I'm assuming yours is too.


Here's what you'll need:

8 oz. ground turkey
1/2 cup chopped fresh cilantro
1/2 cup bread crumbs
3 tbsp. Dijon mustard
1 egg, large, beaten
dash of salt
Ground pepper, to taste


Combine all ingredients in a large bowl, and mix well.

Divide first into four sections, then make two sliders from each section.

At my house we only need a total of 4 for dinner, but I make a double batch and put 4 sliders per snack size Ziploc, separated with parchment paper.

I also put 4 Sandwich Thins Mini in a Zip lock so they'll be fresh when I need them.


Place burger on an oiled grate or frill over medium heat until they reach an internal temperature of 165F.

I love the way these brown up. That's one of the things I've never liked about turkey burgers, they never look done so I end up over cooking them and drying them out.


Okay, now we can get to building our sliders.

I toast the Sandwich Thins first, don't separate them until after you toast them... put them in the toaster whole.

I like to put some lettuce on the bottom, it keeps the bottom bun from getting too soggy.


Salsa takes the place of mayonnaise or mustard. It's low calorie, no fat, and what goes better with cilantro than salsa?


Top the salsa with a fresh slice of tomato... mmmmmm... I'm getting hungry all over again....


A few more leaves of lettuce. I love the crunch. Romaine is technically nutritionally better for you, but... at the end of the day, iceberg was on sale.


And here we have the finished sliders!

Yes, I did slide some extra tomato in there, I had extra, what are you gonna do? It's not like it's cheese or something.

Enjoy!!

Wednesday, February 29, 2012

My Favorite Fruit (and spinach) Smoothie

This makes 2 servings, a 24 oz. & a 16 oz. size. I usually drink the larger one for breakfast, and stash the other one in the fridge for a snack later in the day.

What I like most about this smoothie (besides the taste) is you can prep and stuff everything in a blender the night before and store it unlblended in the refrigerator, then in the morning just pop it on the base and you've got a smoothie for the road in less time than it takes to brew a cup of coffee.


Here's the calorie counts so you can customize and add up your total.

5 strawberries = 30
1 medium banana = 105
1 large kiwi = 56
1 naval orange = 69
1 cup organic baby spinach = 7
1 tbsp flax oil (highest lignans) = 110
1/2 cup 0%fat Greek yogurt = 70


Just blend it all together until smooth, and you're done!

If you drink this entire shake (which I sometimes do) it's a hefty amount of calories (total = 447 calories) for a liquid meal, but I'm okay with that because of the following:

1. It's first thing in the morning and I have all day to burn it off.
2. It's a drink, so it's easy to take in the car with you in the morning, which cuts down on "I don't have time for breakfast".
3. I get my fruits & veggies in for the day so I can check that off the list of things to think about.
4. I get the benefits of flax oil, and I sneak the innards of an MSM capsule in there too, which helps my hips and knees when I get on a regular workout routine.


If your smoothie is too thick, add a little bit of water... NOT juice because that will add more sugar.

If you like a thicker milkshake consistency throw a few ice cubes in.

Enjoy! Get fit, get healthy, be happy!

Monday, February 27, 2012

Bacon Asparagus Bundles


Anything... I mean anything wrapped in bacon is okay in my book!

I meant this to be a side dish, but the next time I make them they will be the entree.

I had green bean bundles at my cousin Karen's wedding, and thought they were amazing, but being a huge fan of asparagus, I've been excited to try these. I wish I hadn't waited so long.


Peak season for asparagus in the U.S. is April & May, and peak season for bacon is all day, every day, all the time, forever and ever, Amen.

I didn't really measure anything, but here's what I did: Pre-heat oven to 425

1 lb. asparagus
8 strips bacon (approximately)
olive oil
brown sugar (about a handful)
salt & fresh cracked pepper

Bend the bottom half of one asparagus stalk until it snaps at it's natural breaking point. Don't freak out if it's almost half, the bottom piece will taste woody, trust me, throw it away.

Once you've done this with one stalk, cut the rest at the same point.


I placed the asparagus in a large bowl, drizzled with olive oil, brown sugar and a sprinkle of sea salt.

Then wrap about 5 to 6 stalks in a slice of bacon, and place them on a lined baking sheet.

A few turns of fresh cracked pepper, and pop them into the oven.


Bake for 15 minutes, turn the bundles and bake for 15 more minutes.

I took them out of the oven and put them on a paper towel to soak up excess oils, then onto the serving dish.

This recipe is the perfect balance of good & evil. So delicious! I hope you enjoy it as much as I did.

Thursday, February 23, 2012

Steak & Cheese

This is one of my ALL time favs!

I just can'te eat it too often because, well... because these hips don't lie.

In Philadelpia they call these "cheese steaks", but they also make them very differently, so in my mind, this is an entirely different sandwich.


Here's all you'll need for this one:

  1. Sub rolls (toast them)
  2. Mayonnaise (yes, I used light for this)
  3. Hoagie spread
  4. Lettuce
  5. Tomato
  6. Onion
  7. Cheese (your favorite will do just fine)


My sister Heather turned me on to shredded lettuce for the ultimate steak and cheese. She said "I don't know why, but it completely changed everything." She was RIGHT!

Heather has the luxury of a Super Wal-Mart around the corner from her house, I have nothing around the corner, so off to Publix I went in search of bagged shredded lettuce.

I found it, but not at the Wal-Mart price. It was $2.19 a bag, or I could get a head of iceberg lettuce and shred it myself for $1.49.

So... I shredded, washed, and threw it in the salad spinner, then into the fridge so it would be crisp for my sandwich. It came out perfectly, and I have enough lettuce left over for a salad. If I ever get around to making one of those again. I can't think about such nonsensical things when the aroma of steak and cheese is wafting through the air.


These little miracles will make you say "What is a Steak-Um again?" Another gem of steak and cheese knowledge from Heather.

Wal-Mart's brand is about $5.00 for a 16 oz box, but that's such a long drive.

I found Steak-Eze at Publix in a 14 oz box. I would never buy them at the normal price of $7.49, but they were on sale, and a coupon on the box... I now have a freezer full and I'm a happy girl.


You just pop them frozen onto a medium heat frying pan or grill, (no oil) and put a lid on them for 1 to 2 minutes per side.


then the magic starts to happen, they're starting to look more familiar now right?

Flip them and poke at them a little with your spatula, and they will begin to resemble what you've seen coming from your favorite sub shop.


Hoagie Spread. It's the only point of contention between my sister and I. I love it, she says okay, but not on my steak and cheese.

Just as well I suppose, since we looked everywhere while I was there last month, and you just can't get this in the San Diego area.

For me, there is nothing yummier than these pickled hot peppers mingling in with the mayonnaise.


This picture is just here because it makes my mouth water.

Mayo, and hoagie spread, together at last on a toasted roll. I do believe I could make a sandwich of just this.

Okay, my mouth is watering, and I'm smiling now. We can move on.


Sauteed onions. Another must for a perfect steak and cheese.

The very attentive might notice that there is a red onion in the picture of ingredients, and this is clearly not a red onion.

I remembered I had leftover sauteed onions from the avocado whipped potatoes with caramelized onions I made a few days ago, so I used those.


Oh... we're getting close. It's time to start assembling the masterpiece!

If you're using the Steak-Eze breakaway steask, this is two "steaks". The Wal-Mart brand steaks are bigger, and you only need one per sandwich.


What? I mentioned how much I loved onions right?

Plus, there was a ton left over, and I couldn't just let them go to waste.


And here you have it!

One of my all time favoire meals in the world.

Serve it up with these baked onion rings and you'll be the hero!

Wednesday, February 22, 2012

Baked Onion Rings

Update: These are AWESOME cold too! Leftovers are still crunchy and delicious!

I have nothing against fried food, but at some point you have to dial it back a bit, at least on the side dish, so here's my solution.

When the aroma hits you, and your mouth waters, you will thank me. I won't be there, so I'll say it now.

You're welcome.


Get these things together:

1 large onion (any kind will do)
2 cups cornflakes
3/4 cup dried breadcrumbs
1 large egg
2/3 cup buttermilk
1/4 cup AP flour
1 large onion (any kind will do)
2 tbsp olive oil


I forgot to put the buttermilk in the picture of ingredients, because at the time, it was in the refrigerator, with onions soaking in it, but....

Remember these little cuties? I needed buttermilk for some cornbread I was making a few weeks ago, and I froze the leftover buttermilk in ice cube trays.

Last night I took about half of this quart sized bag of buttermilk cubes, and put them into a Rubbermaid container in the refrigerator to thaw.

I chose this container because it was large enough to put all the sliced onions in when the time comes, why dirty two containers right?

Time to slice the onions. Nobody's favorite thing, but since we have to do it anyway, lets get the most out of it shall we?


Slice the onion slightly more on the thick side, thicker than you would for sandwiches, keeping in mind you want them to retain their shape after being cooked, too thin and you'll get floppy rings.

Pop out the centers, they don't make good onion rings, but they won't go to waste....


I diced up the centers of the onion slices, and it yielded 1/2 cup of chopped onions that are now in my freezer, waiting for a recipe that needs them, and when it comes along I won't have to chop onions!


This is the container I thawed the buttermilk in. About an hour before I wanted to eat, I sliced up the onions and put them in the buttermilk to soak. In the fridge.

They aren't completely submerged in the buttermilk, so put the lid on and shake it around.


Remove the onion slices from the buttermilk, but don't discard it! Pile the onions up on a plate, they'll be the start of your assembly line in a few minutes.

Look how well the buttermilk sticks to the onion rings when you take them out!

This is what's going to give you that thick batter just like deep fried, but without the extra fat.


Preheat oven to 450 degrees.

Pour oil onto baking sheet, and put it in the oven for 2 minutes. When it comes out, tilt the baking sheet to evenly distribute the oil.

In a food processor or blender, combine corn flakes and bread crumbs, pulse until they are fine, and put them in a medium bowl.

In another medium bowl mix together the egg, buttermilk leftover from soaking, flour, salt & pepper, and any seasonings you choose, such as cayenne pepper, Old Bay, cumin, oregano, etc. It's going to look like there isn't enough of this, but I promise, it is enough.

Dredge the onions in the egg mixture, then the breading, then place on the baking sheet. Don't overlap or they'll be soggy.

Bake for 6 minutes, flip, bake 6 more minutes. That's it!


Tuesday, February 21, 2012

Grilled Reuben & Baked Sweet Potato Fries


This is a match made in heaven. Cheesy, meaty, saucy goodness paired with well seasoned baked sweet potatoes. YUM!


Here's what you'll need:

Rye or pumpernickel bread
Corned beef
Swiss cheese
Sauerkraut
Thousand island dressing
Butter


I start by putting a little (a lot) of butter in a frying pan on medium heat, then begin building an open-faced sandwich.... meat, sauerkraut, dressing, then cheese. In that order. The order is important for it not to fall out on you when you flip it.


This is the way I find it easiest to transfer it all to the frying pan without loosing all the goodies.


Then you can top it with the other piece of bread and some more butter for when you flip it... CAREFULLY.


And this work of art -------->
is what you will end up with.


Next up, baked sweet potatoes.

Preheat your oven to 450 degrees.
All you need is a sweet potato, a tiny bit of olive oil, and whatever seasonings you want to use.

I prefer to keep the skin on my potatoes, you get more of the nutrients that way, plus let's face it, it's easier. Make SURE you wash AND DRY them well though, or the olive oil won't stick.

Slice the potato into strips, and place in a large bowl. Drizzle with olive oil, just enough to make them glisten, you don't want them swimming in it, they'll turn out soggy, and nobody wants that.

Next sprinkle with your seasonings and give them a toss. My favorite seasoning for sweet potatoes is sea salt and fresh rosemary... but... since I didn't have any rosemary I went Maryland style. Salt, a pinch of sugar, a few pinches of Old Bay and some black pepper.

Lay them on a baking sheet lined with parchment paper, making sure they don't overlap or touch... again, they'll be soggy.

Bake for 15 minutes, turn once, and bake for 15 more minutes. Done.

I "recycle" my paper grocery bags for baked french fries. Just rip off a strip, wrap it in a cup shape, and fold up the end... Wha-lah! Instant french fry cup.

Enjoy!

Monday, February 20, 2012

Tomato Basil Soup & Grilled Cheese


This is a classic, and who doesn't love tomato soup right? Okay, confession time. I don't. In fact, I hate it.

Tomato soup has always grossed me out. It feels to me like slurping up a bowl of ketchup, but I always wanted to like it... because it makes everyone else so happy.

Tonight was the night! I can't wait to make it again with more add ins, the possibilities are endless!


Okay, grilled cheese. Yes, it's just a grilled cheese, but there are a zillion
ways to make one. I wanted to tie mine in with the tomato soup. This is what I used.

From there, it's a grilled cheese. You know what to do.


Now on to the tomato basil soup. Here's what you'll need:
  • 1-28 oz can diced or crushed tomatoes
  • 3 tablespoons tomato paste
  • 1 tablespoon of sweetener of your choice, agave nectar, honey, maple syrup, etc....
  • basil (to taste)
  • 2 cloves of garlic
  • 2 tablespoons olive oil
  • 1/4 cup whipping cream

Combine all ingredients except the cream in a blender, and puree.
Once blended, add cream and blend.
Transfer to a saucepan and heat slowly, being careful not to let it boil, the cream will scorch.


Here we have the finished product, and I'm happy to report that I now LOVE tomato soup, and you just can't go wrong with grilled cheese.


And BONUS! Look was was leftover for the freezer!

I don't see any reason why I can't freeze this, according to the ingredients. I'm going to give it a whirl, and when I thaw and reheat it, I'll let you know.

Friday, February 17, 2012

Sweetheart's Martini


Valentine's Day is over, but it's still February, and it's Friday, so let's all have a cocktail!

Be warned though, these are so yummy and they will sneak up on you. Ask my sister, who was video chatting with me through the R & D last night.

She was there with me as I whipped out the first drink, (note that I said "first") and took pictures. Then we chatted while I sipped and we decided which pictures came out the best.

See the little red spots on top of the drink? I bought these eatable confetti hearts that I wanted to float on the top, they worked great when I tested them on a glass of water, not so great on vodka. I'm sure there is a science lesson in there somewhere. I'm also sure I don't care.

The confetti sunk to the bottom, which was okay, but it left these little red dots behind, so I wanted to make another one to get a better picture.

Off to the kitchen I went to make another drink... and forgot to take pictures. It went downhill from there, but the point is these drinks are delicious, and my sister had a good laugh at the show I put on for her.... dancing around my kitchen shaking the martini shaker while singing "shake it like a Polaroid picture".

Serves 2
  • 6 ounces Godiva white chocolate liqueur
  • 2 ounces Pinnacle whipped Cream vodka
  1. Wet the rim of the glasses with the vodka and dip into red sugar.
  2. Fill a cocktail shaker halfway with ice. Pour ingredients into the shaker, and shake for 20 seconds. Works best if you sing "shake it like a Polaroid picture" while doing this step.
  3. Strain into glasses and enjoy!


Thursday, February 16, 2012

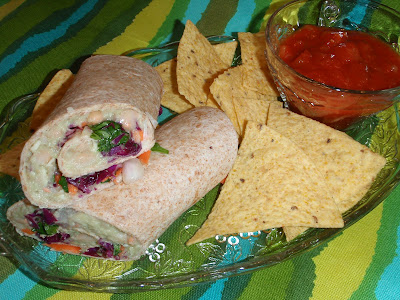
White Bean & Avocado Wrap


Just tried this dish for the first time and I'm so glad I did!


It was fast, inexpensive, healthy, AND will be a great dinner for those hot summer nights because there is no cooking involved!


Also qualifies for a vegetarian dish, possibly vegan as well, not sure if there are dairy products in the wraps.


I highly recommend you try this recipe...


Now, if only someone would bring me a margarita I'd be set!


Ingredients:
  • 2 tablespoons apple cider venegar
  • 1 tablespoon canola oil (I used olive oil)
  • 2 tablespoons finely chopped canned chipotle chile in adobo sauce
  • 1/4 teaspoon salt
  • 2 cups shredded red cabbage
  • 1 medium carrot, shredded
  • 1/4 cup chopped fresh cilantro
  • 1 - 15 oz can white beans, rinsed
  • 1 ripe avocado
  • 1/2 cup shredded sharp cheddar cheese
  • 2 tablespoons minced red onion
  • 4 - 8 to 10 inch whole-wheat wraps or tortillas

Directions:

  1. Whisk vinegar, oil, chipotle chile and salt in a medium bowl. Add cabbage, carrot and cilantro; toss to combine.
  2. Mash beans and avocados in another medium bowl with a potato masher or fork. Stir in cheese and onion.
  3. To assemble the wraps, spread about 1/2 cup of the bean & avocado mixture onto a wrap (or tortilla) and top with about 2/3 cup of the cabbage & carrot slaw. Roll up. Repeat with remaining ingredients.
  4. Cut the wraps in half to serve.